This article consists of two sections: The first part describes how you can deploy software or script to remote Windows 7, 8, and 10 device(s) using Miradore. This part assumes that you have already added the app to Miradore. The second part of this article explains how you can add new software or scripts to Miradore.
Device users do not need to interact with installers or even have administrator privileges on the devices, because Miradore can perform all actions silently in the background.
Preparations
You will need the installation media (setup.exe, setup.msi or similar) for each software that you want to deploy remotely to your Windows computers with Miradore.
For the .exe files, you will also need to know the command line parameter which runs the software automatically/silently without user interaction. The parameter varies by the software manufacturer and you can usually find it in their documentation.
Every Miradore site has a quota limit of 5 GBs for file uploads. If you need more space for storing your apps, contact our support team and request to change the limits.
Requirements
- Premium Plan of Miradore
- This feature is supported for Windows 7, 8, and 10 devices that are enrolled in Miradore
How to deploy apps or scripts to Windows devices?
You can deploy apps and scripts to Windows devices from the Devices page, Applications page, or through an individual device page.
Just select the devices where you want to deploy the software and choose Deploy > Application from the page toolbar. This will start up an application deployment wizard which shows you all applicable deployment options.
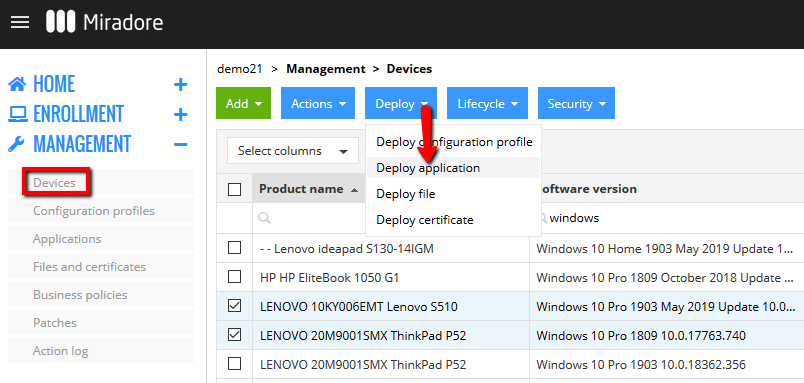
You can follow up on the application deployment from the Management > Action log page, or on the Device page.
Adding new software or scripts to Miradore
Before you can distribute an app or script, you need to add it to your Miradore site. Afterwards, you can deploy it to as many of your Windows devices as you want.
1. Go to the Management > Applications page on your Miradore site, and click the Add > Windows application button from the page toolbar.
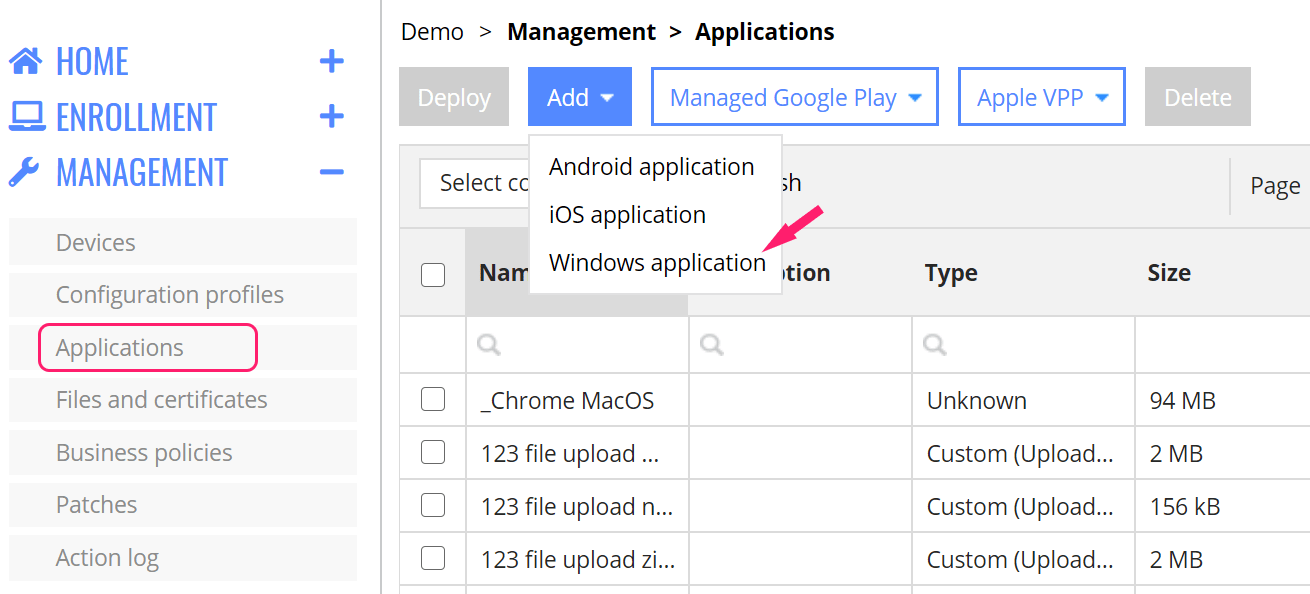
2. Select the application type.
Advanced is the recommended way to add Windows software or scripts to Miradore. It supports 64-bit Windows 7, 8, and 10 devices that have a Miradore Online Client 1.1 (or newer) installed.
- You can use this method, for example, to deploy .msi or .exe files.
- You can deploy one or multiple files (as a zip package) if you want to include a configuration file in the deployment.
- The Management type column on the Devices page shows you, which devices have a Miradore Client installed. The client is also present if the column value is Both.
- Advanced is the only applicable distribution method for Windows 10 Home devices, but you might need to install Miradore Online Client to the Home devices manually.
MSI method supports 32- and 64-bit Windows devices that are managed with Miradore’s built-in MDM profile. It lets you add only applications that are installed using Microsoft installers. Please note that you can also deploy MSI packages using the Advanced method.
3. On the next step of the wizard, you are asked to enter the necessary information regarding the deployment.
Name of the software/script on the Miradore platform.
Description of the software/script.
Media type: Upload the software installation media or give a link where Miradore Client can download the setup media during the installation. In the Advanced wizard, you can also choose No media which is suitable for running scripts on your devices.
The following configuration options depend on the selected application and media type.
Advanced: File upload
Uploaded file: Use the select button to upload the software installation media or script to Miradore.
- If you upload an EXE file, make sure to define the silent installation parameter in the Command line field. You can usually find the parameter for the silent installation from the software manufacturer’s documentation.
- You can upload multiple files as a .zip package in case you want to pass a configuration file with the installer to Miradore. Miradore Client extracts the .zip package to a temporary working folder on the target device during the deployment and removes the files immediately after the installation.
- Every Miradore site has a quota limit of 5 GBs for file uploads. If you need more space for storing your apps, contact our support team and request more space.
Command type: Choose Install MSI if the uploaded file is a Microsoft installer file (.msi). For other software setup files (.e.g. .exe file) choose the Execute application. With the Execute command and Execute PowerShell options you can tell Miradore Client to run either a CMD command or a PowerShell script on the device.
Command-line: The Effective command line field shows the CMD command that will be executed on the target device when you deploy the application to a device. You can use this Command line field to modify the effective command. Always remember to specify the silent installation parameter for the .exe files, because otherwise, the deployment of EXEs will fail.
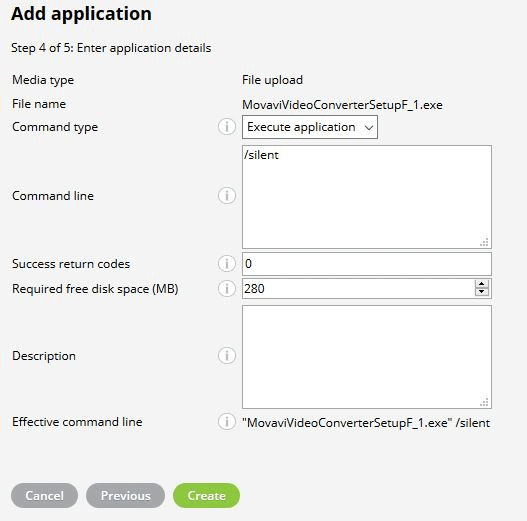
Success return codes: Check from the manufacturer’s documentation the return codes of a successful software installation and enter them here. When entered correctly, Miradore is able to better track the deployment status. You can add multiple success return codes by separating them with commas, and you can also add ranges using a hyphen like “0, 200-203, 3010”.
Required free disk space (MB): Specify here, in megabytes, the amount of free disk space needed for the deployment.
Effective command line field shows the CMD command as it will be executed by Miradore Client on the target device(s).
Advanced: External URL
URL field defines the full URL address where Miradore Client can download the application or script file when it's deployed to a target device.
File name: Miradore Client downloads the file specified in the URL field and saves it to the target devices with the name from this field. After the installation, the file will be automatically removed from the device.
MSI: File upload
Uploaded file: Click Browse and select here the installer file that is used to install the desired software.
Command-line options: Here you can enter the application-specific command-line options for the software installation. Check software vendor-specific documentation for more information about the command-line options.
Install to all users: This selection defines whether the software will be installed for all users of the device or just for the one who is logged in at the time of the installation. Please note that the software deployment will fail with "Access denied" error code if you choose to install the software only for the logged-in user but there is nobody logged in when the deployment is attempted.
Description: Free text field for describing the software.
Retry count: The number of times Miradore should attempt the software installation in case the deployment would fail. The installation will be marked as failed if the deployment doesn't succeed with the specified number of retries.
Retry interval: The number of minutes before Miradore should try to redeploy the software after a failed installation attempt.
Timeout: Amount of time, in minutes, how long the installation process can run before the installer considers the deployment as failed.
MSI: External URL
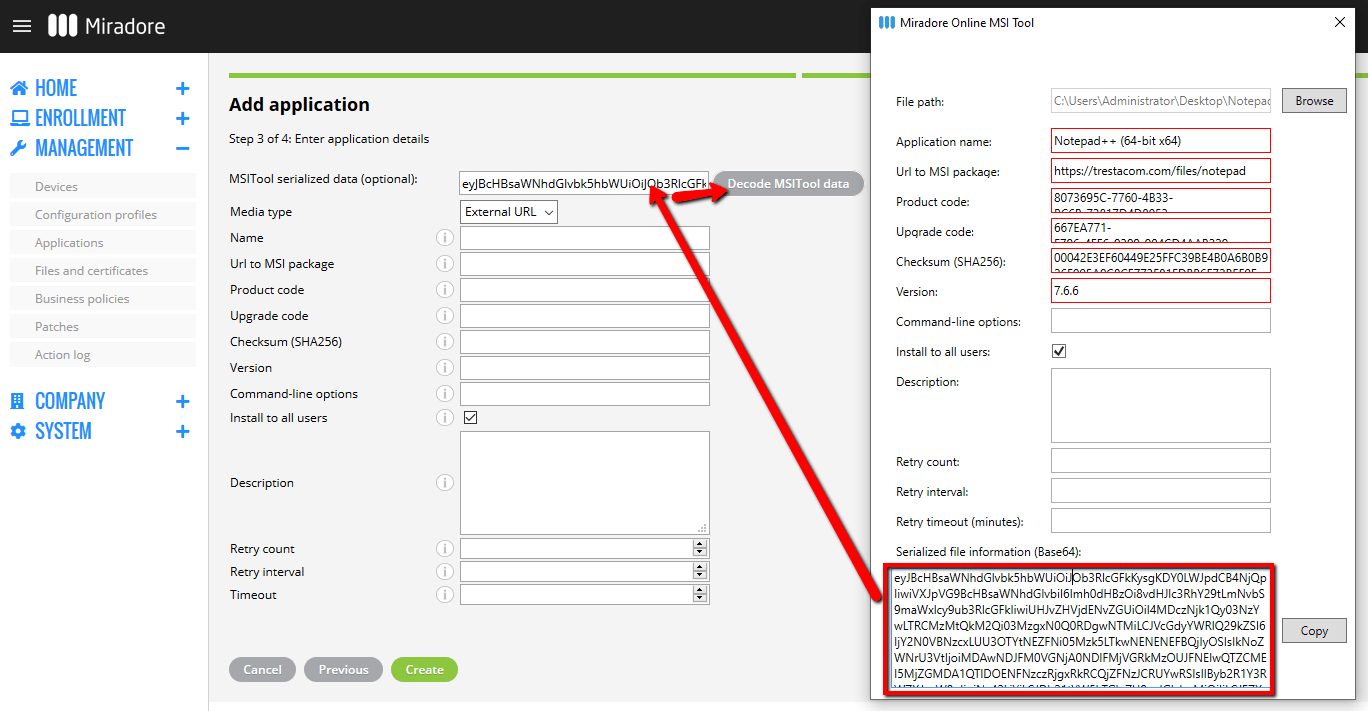
MSITool serialized data: Download Miradore's MSITool. Start up the tool on your computer and choose the installer of your desired software in the File path field using the Browse button.
You will notice that the tool resolves you all details about the given installer file. The only thing you need to add is the URL address to the place where the installer file is hosted. Enter the file address to the Url to MSI package field.
You can then configure Command-line options, Install to all users, Description, Retry count, Retry interval and Retry timeout if you want. See the description of these fields above.
Copy the serialized file information from MSITool using the Copy button. Paste the data into the MSITool serialized data field on Miradore and click the gray Decode MSITool data button. This will auto-fill the rest of the configuration fields based on your selections in the MSITool.
Troubleshooting
If an MSI deployment fails with an error code, you can add an MSI installation parameter /lvx* to the deployment and get more details about the problem. Copy-paste the below-mentioned example to the application's MSI parameters field, save and re-deploy the MSI application. The log file can be then found from the specified file path on the computer where you attempted to deploy the application.
/lvx* C:\temp\deployment_troubleshoot.log
Have feedback on this article? Please share it with us!
Previous Article:
« Deploying Microsoft 365 office apps to Windows devices
Next Article:
How to update Windows apps deployed using an MSI package? »