FileVault is a security feature used to encrypt the system disk on macOS devices. Encryption helps to prevent unauthorized access to documents and other data on the device. With Miradore, it is possible to enforce the activation of FileVault disk encryption for the managed macOS devices remotely using a configuration profile.
Requirements
- Premium subscription for Miradore
- Administrator access to Miradore
- Miradore's FileVault configuration profile is compatible with devices running macOS 10.9 or above.
- Escrowing personal recovery key can be enabled for devices running macOS 10.13 or above.
- The use of an institutional recovery key requires you to create a FileVault master keychain with a macOS computer.
Enforcing FileVault activation on macOS devices
Go to Management > Configuration profiles page to add a new configuration for FileVault (macOS > FileVault). Configure the FileVault encryption settings.
Recovery key type
The recovery key can be used to unlock/decrypt the encrypted drive if the user forgets or loses their password. Choose whether you want to use personal, institutional, or both types of recovery keys for unlocking encrypted files. Using both recovery keys means that an encrypted disk can be unlocked using either a personal or institutional recovery key.
The personal recovery key
This is device-specific and will be generated automatically at the target device when the encryption is enabled. Personal recovery can be escrowed to Miradore or alternatively, the device’s user is responsible for storing the recovery key.
The institutional recovery key
Organizations can use the institutional key to unlock any macOS computer's disk that has been encrypted with a certificate generated from the same keychain. In this case, the administrator is responsible for keeping the recovery key stored in a safe location. The use of an institutional recovery key requires you to create a FileVault master keychain with Mac. For more information, refer to Apple's documentation.
After creating the FileVault master keychain, ensure you have a copy of it in a safe location because the private key from the keychain will be needed to unlock disks encrypted with a certificate generated from the keychain.
Export the FileVault Recovery Key certificate from the master keychain using the "Keychain Access" app on a Mac device. Upload the certificate to Miradore through the Management > Files and Certificates page. On the page, go to the Certificates tab and click Add to upload the certificate.
Select the uploaded certificate for the Institutional recovery key field on the configuration profile wizard.
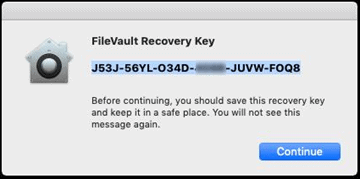
Show personal recovery key
This setting defines whether the personal recovery key is shown to the device user after FileVault has been activated. Note: If escrowing is not enabled, it is the device user's responsibility to store the personal recovery key in a safe location.
In the following screenshot, you can see how the personal recovery key is shown to the device user.
Escrow personal recovery key
Key escrowing is a technique to back up the personal recovery key securely to Miradore. If this option is selected, the recovery key will be stored to Miradore in an encrypted format and can be retrieved from the device’s Security section.
Note: the personal recovery key is escrowed only during encryption.
If the device has been encrypted prior to deploying the Miradore FileVault configuration profile with escrowing enabled, follow the instructions in Escrowing personal recovery key for the encrypted device.
Location
The value of this informational field will be displayed in the FileVault profile’s Escrow location field on the macOS device. This is the description of the location where the personal recovery key is escrowed.
Prompt user at
This field defines when the device user will be prompted to activate FileVault encryption after the device has received the configuration profile from Miradore. When prompted at the login, the user can be given an opportunity to bypass the activation 1-5 times.
Login bypass limit
Specifies how many times the device user can bypass the activation of the FileVault disk encryption at login.
After finalizing the creation of the configuration by enter a name and description for the profile, you can deploy it from the Devices page (Management > Devices). You can also create a business policy that deploys the configuration profile to tagged devices automatically.
Reporting
You can monitor the configuration deployment from the Management > Action log on Miradore. You can also see which certificate was used to encrypt the device from the Device page.
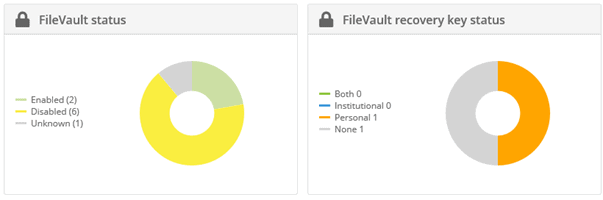
To see which devices have FileVault enabled, go to Home > Dashboard on Miradore, and click Select dashboard > iOS/macOS from the page toolbar.
You will see two widgets: FileVault status and FileVault recovery key status which summarize the status of FileVault encryption on the managed macOS devices.
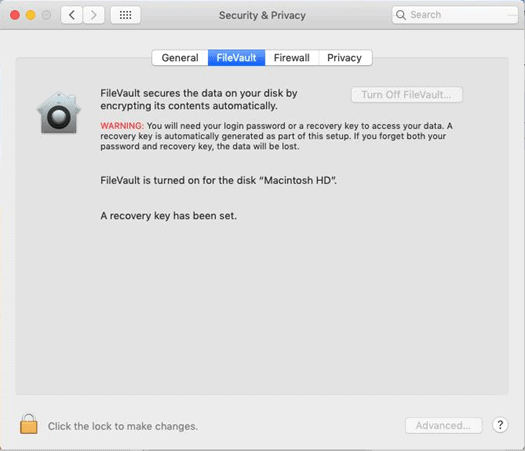
How to check the FileVault status on a macOS device?
The device user can check the FileVault status from the system preferences. The device user can disable FileVault using their login password if necessary.
Important information
Removing the FileVault configuration profile from a device through Miradore does not turn off the disk encryption.
Have feedback on this article? Please share it with us!
Previous Article:
« Restrictions for macOS
Next Article:
Custom configuration profiles for Macs »