Learn how to enroll your Android device as Fully managed or Fully managed with work profile in Miradore by scanning a QR code.

About QR code enrollment in Miradore
You can enroll your organization's devices running Android 7 or later as Fully managed, or devices running Android 11 or later as Fully managed with work profile by scanning a QR code with the device's camera.
Miradore allows you to configure certain settings that are encoded in the QR code and apply to the devices during enrollment.
Depending on your approach, you can initiate enrollment either from the Android Enterprise or the Enroll device page.
Once enrolled, users can only remove management from their devices by factory resetting them. This can be prevented with a Restrictions configuration profile.
Other enrollment methods
Apart from using a QR code, the following methods of enrollment can be used for Android devices with the Fully managed or Fully managed with work profile management type:
Configure the settings of the enrollment QR code
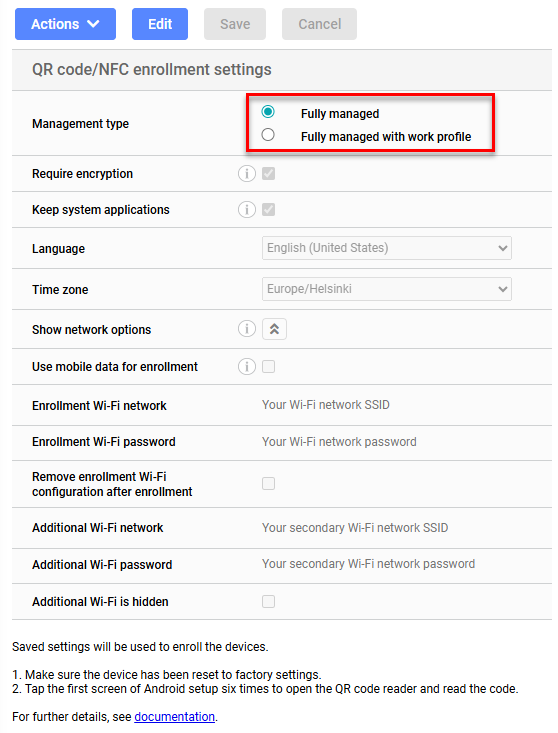
Settings such as Wi-Fi configuration, Miradore enrollment credentials, language, and time zone for device setup are encoded in the enrollment QR code. These settings can be configured and customized on the Android Enterprise page in Miradore.

The configuration of these settings is optional, but it provides a unified configuration for all Android devices to be enrolled in Miradore, making device setup less time-consuming.
To configure the enrollment settings, do the following:
- Navigate to Enrollment > Android Enterprise and select Edit at the top of the page.
- Configure the following settings:
- Management type: The QR code on this page changes according to the selected management type (Fully managed or Fully managed with work profile), but the configured settings are valid for both management types. This selection is only relevant during enrollment.
- Require encryption: Select the checkbox to encrypt the device to secure data.
Note: Devices running Android version 5 or later are encrypted by default. - Keep system applications: Select this checkbox to preserve default applications installed on Android devices. Device users can use these applications after enrollment.
Learn more about managing Android system applications in Managing Android system applications with blocklists and allowlists. - Language: Select the device's default language.
- Time zone: Select the device's default time zone.
- Show network options: Select the arrow button to show or hide configurable network connection settings.
- Use mobile data for enrollment: Select the checkbox to use mobile data for enrollment instead of a Wi-Fi connection.
- Enrollment Wi-Fi network: Enter the SSID of the Wi-Fi network that can be used by the device to automatically connect during enrollment. This way, the device user does not have to select a Wi-Fi network from the list of available networks on the device during enrollment.
- Enrollment Wi-Fi password: Enter the password of the Wi-Fi network that can be used by the device to automatically connect during enrollment. This way, the device user does not have to enter the password during enrollment.
- Remove enrollment Wi-Fi configuration after enrollment: Select this checkbox to remove the Wi-Fi configuration from the device after it is enrolled. The device user has to select a Wi-Fi network and enter its password to connect to the internet via Wi-Fi.
- Additional Wi-Fi network: Enter the SSID of a secondary Wi-Fi network to which the device can automatically connect after enrollment.
Note: The additional Wi-Fi network cannot be used by the device for enrollment. It is useful, however, if the Remove enrollment Wi-Fi configuration after enrollment option is enabled, because the device can automatically connect to the additional network after enrollment is finished. - Additional Wi-Fi password: Enter the password of the Wi-Fi network to which the device can automatically connect after enrollment.
- Additional Wi-Fi is hidden: Select this checkbox if the secondary Wi-Fi network is a hidden network.
- Select Save to confirm the settings.
- Select Actions > Download Android zero-touch enrollment configuration or Actions > Download Knox Mobile Enrollment configuration to save your settings for Android zero-touch enrollment or Samsung Knox Mobile Enrollment.
Results: Your Android devices enrolled as Fully managed use the configured settings during enrollment.
Enroll your devices in Miradore.
Enroll the device in Miradore with a QR code
Requirements
To enroll an Android device in Miradore as Fully managed or Fully managed with work profile, it must meet the following requirements:
- It must be running one of the following Android versions depending on the management type:
- Fully managed: Android 7 or later
- Fully managed with work profile: Android 11 or later
- It must be new or reset to factory settings.
- It must have a functional camera.
Tip: We highly recommend configuring managed Google Play Enterprise for your organization before you enroll any devices. This way, you can take full advantage of all of Miradore's management features, such as remote application management, through Android Enterprise.
Enrollment can be initiated from the Enrollment > Android Enterprise or Enrollment > Enroll device page depending on your needs.
Initiate enrollment from the Android Enterprise page
After configuring the enrollment settings, you can enroll your organization's devices directly from the Enrollment > Android Enterprise page. Enrolling devices this way does not assign a user to the device, therefore, this method is mostly recommended for enrolling devices whose users are unknown or are to be determined later. However, if you import the device identifiers into Miradore before enrollment, the devices can be linked to their users automatically during enrollment.
Note: If device user information exists in Miradore and managed Google Play Enterprise is configured for the site, Miradore creates a managed account for each device during enrollment. If device users are added to Miradore and assigned to the devices after the devices have been enrolled, you may need to create managed Google Play user accounts manually.
- Optional: Import the device identifiers into Miradore.
- Navigate to Enrollment > Android Enterprise.
- Choose the Management type by selecting the Fully managed or Fully managed with work profile radio button.

- Turn on the new or factory reset device and tap six times in the same spot on the first screen of the setup wizard.
Note: Some devices running Android 7 or 8 may require a network connection to download the QR code reader.
Result: The QR code reader opens and camera is turned on. - Read the QR code with the device.
Tip: If you have problems reading the QR code, try adjusting your browser zoom.
Result: Enrollment is automatically initiated on the device. - Follow the steps in the setup wizard.
Results: The device is enrolled in Miradore and appears on the Management > Devices page. If the device was enrolled as Fully managed, it is automatically tagged as Device owner.
What to do next: Assign a user to the device. If needed, deploy a Restrictions configuration profile to prevent users from removing management from their devices by factory resetting them.
Initiate enrollment from the Enroll device page
If you already know the owner of the device, it is recommended you initiate enrollment from the Enrollment > Enroll device page, as this method involves assigning a user to the device during enrollment.
Initiating enrollment this way applies all configured settings on the Enrollment > Android Enterprise page. However, the QR code displayed here is specific to the user, single-use only, and valid for 72 hours.
- Navigate to Enrollment > Enroll device page.
- Select Android.
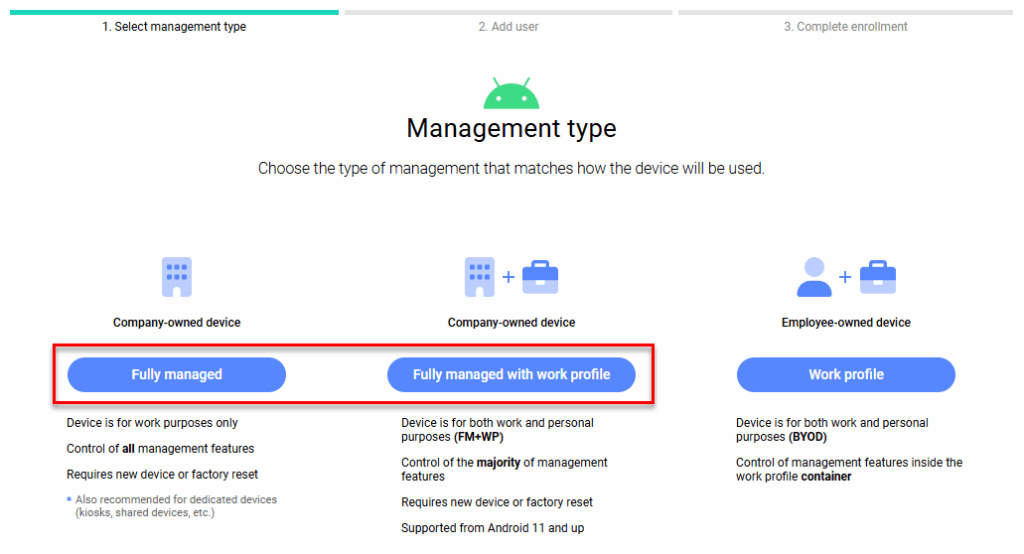
- Select Fully managed or Fully managed with work profile.

- In the Email text box, enter the email address of the device owner or select from existing email addresses, then select Next.
Existing email addresses are taken from the user entries on the Company > Users page. If a new email address is entered, a user entry is automatically created on the Company > Users page.
Note: Miradore only displays the first 500 user entries in the dropdown list. To find further user entries, start typing the email address in the text box. - Turn on the new or factory reset device and tap six times in the same spot on the first screen of the setup wizard.
Note: Some devices running Android 7 or 8 may require a network connection to download the QR code reader.
Result: The QR code reader opens and camera is turned on. - Read the QR code with the device.
Tip: If you have problems reading the QR code, try adjusting your browser zoom.
Result: Enrollment is automatically initiated on the device. - Follow the steps in the setup wizard.
Results: The device is enrolled in Miradore and appears on the Management > Devices page. If the device was enrolled as Fully managed, it is automatically tagged as Device owner.
What to do next: If needed, deploy a Restrictions configuration profile to prevent users from removing management from their devices by factory resetting them.
Previous Article:
« Enroll an Android device in fully managed device mode using a token
Next Article:
Enroll an Android device in fully managed device mode using a token »