This article describes how you can configure the Exchange email service for Outlook on Android devices.
The email configuration method introduced in this article utilizes managed app configurations and it is the recommended way to configure email for devices enrolled in Android Enterprise.
No user intervention is required which makes the email setup easy for the device user. The device user can start using his/her email simply by entering his or her password.
Preparations
- You will need Miradore Premium Plan or an active trial.
- You will need to have Administrator or Editor rights on the Miradore site.
- Managed Google Play Enterprise must be enabled and configured on the Miradore site.
- This method is applicable to devices that are enrolled using Android Fully Managed Device mode or Android Work Profile.
How to Configure the Outlook Email for Android Users?
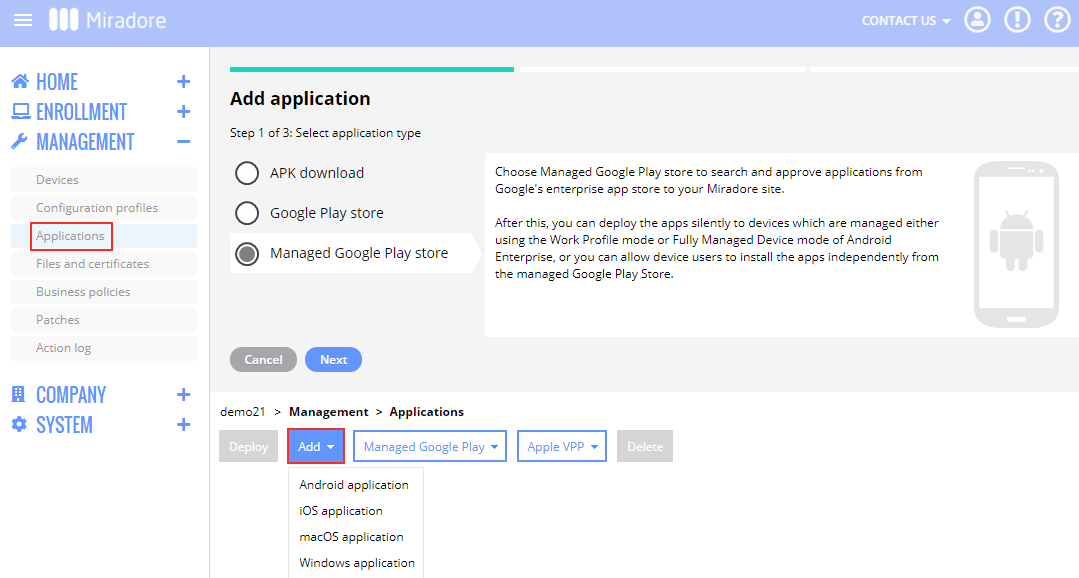
- Go to the Management > Applications page in Miradore, and use the Add > Android application button to add the Outlook app to your Miradore site from the managed Google Play Store. For instructions, see How to Add Managed Google Play Applications.
2. Open the Outlook application's Configuration tab and specify the following configurations:
-
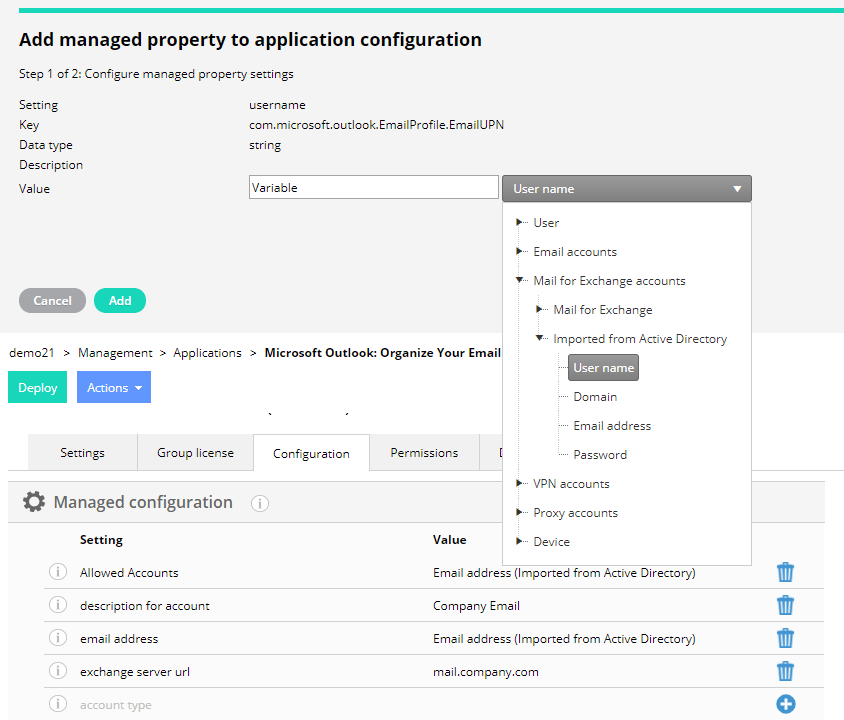
- Setting: Email address Value: This specifies the user's email address. It is recommended to use a variable here (see picture below).
- Setting: Exchange server URL Value: Enter here the hostname of your Exchange server. Use "outlook.office365.com" for Office 365 as demonstrated in the picture below.
- Setting: Description for account Value: For example "Company Email". This setting is optional when using Office 365.
- If you want to restrict device users from adding other accounts to Outlook, then use the Allowed accounts setting to list the permitted accounts. Only accounts listed here are able to sign in. Enter here the user's account. It is recommended to use a variable.
- If you don't want to restrict users from adding their personal accounts to Outlook, then configure the account type = ModernAuth. You don't need to configure the Allowed accounts if you configure the account type.
You can find more information about the configuration options in the Microsoft documentation.

Picture: You can add/remove configuration keys with the blue buttons.
3. You don't need to enter the usernames and email addresses to the User page manually if you import the data from Microsoft Active Directory or using a CSV file. See Importing user information from Microsoft AD or Importing users using CSV for more information.
If you import the usernames and email addresses from Microsoft AD, remember to use the variables imported from Active Directory for the configuration keys as shown in the picture below.
4. After you have configured the app, go to the Management > Devices page. Choose the desired devices and use the Deploy > Deploy application button to distribute the pre-configured email client app to the devices.
5. You can follow up on the deployment from the Management > Action log page, or from the Device page of each target device.
Troubleshooting
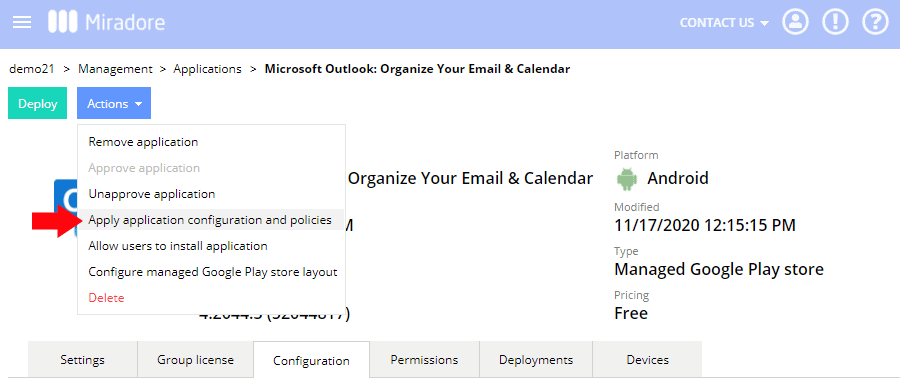
Usually, the app appears as pre-configured for the user and the user can start using the app by entering his/her password. Sometimes, however, the configurations won't affect immediately after the app was deployed. In that case, you can try to reapply the app configurations using the Actions > Apply application configurations and policies button which is located on the Outlook application page.
Have feedback on this article? Please share it with us!
Previous Article:
« Configuring Google Chrome for Android devices using managed app configurations
Next Article:
Configuring Exchange for Gmail on Android »